微信支付(微信支付密码设置)
这次呢是开发小程序的支付功能。因为没有做过微信支付,特此记录,做一个小总结,以便以后使用以及给小伙伴们提供一个像我一样的小白一个参考,我也是一点一点摸索过来的,此文只针对开发支付流程而言以及出现的问题,其它则会略过,只讲解实际动手开发过程 ,
名词和实际开发API看 开发文档
而我用的是普通模式
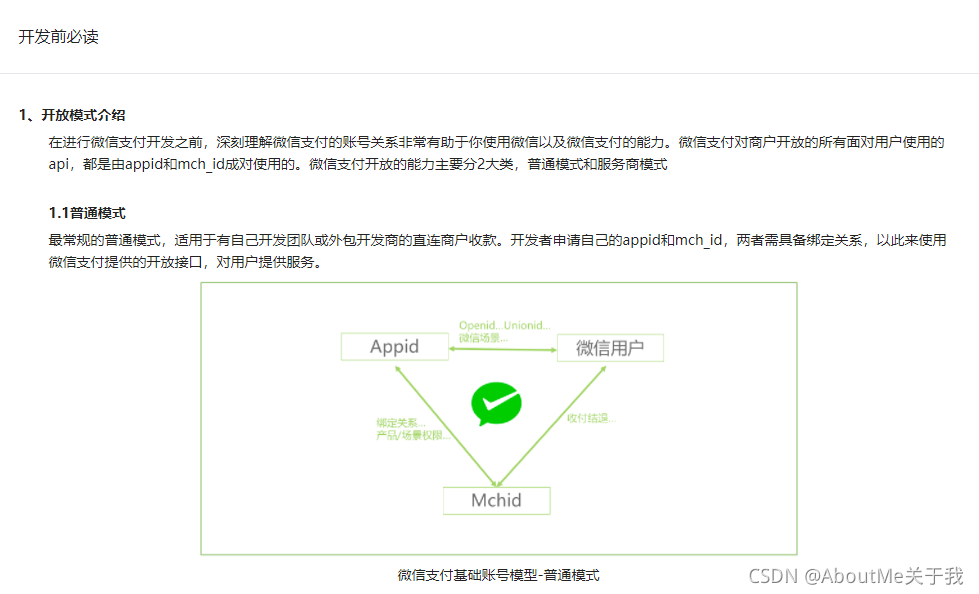
前期准备
1.开通微信支付平台 成为普通商户,上传商户所需信息(这个不用我多说)
2.配置小程序,获取appId (小程序项目也和支付无关,只需小程序的appId ,其它不表)
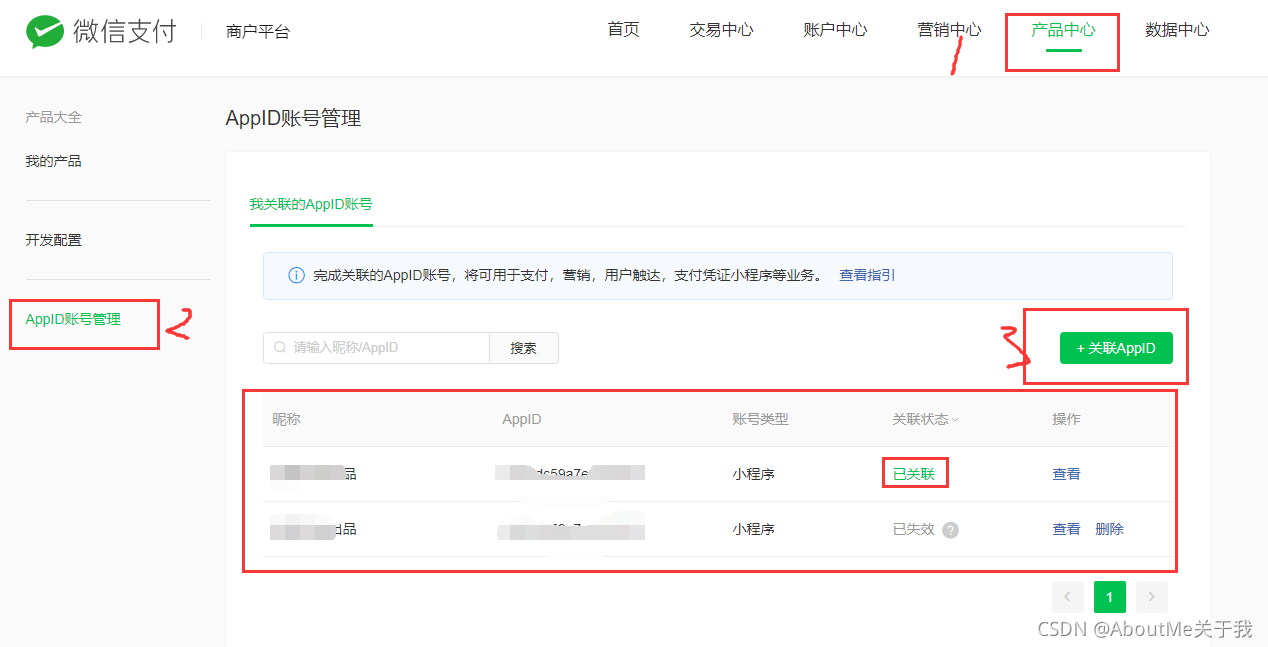
3.小程序appId 关联绑定商户支付平台 ,如图:
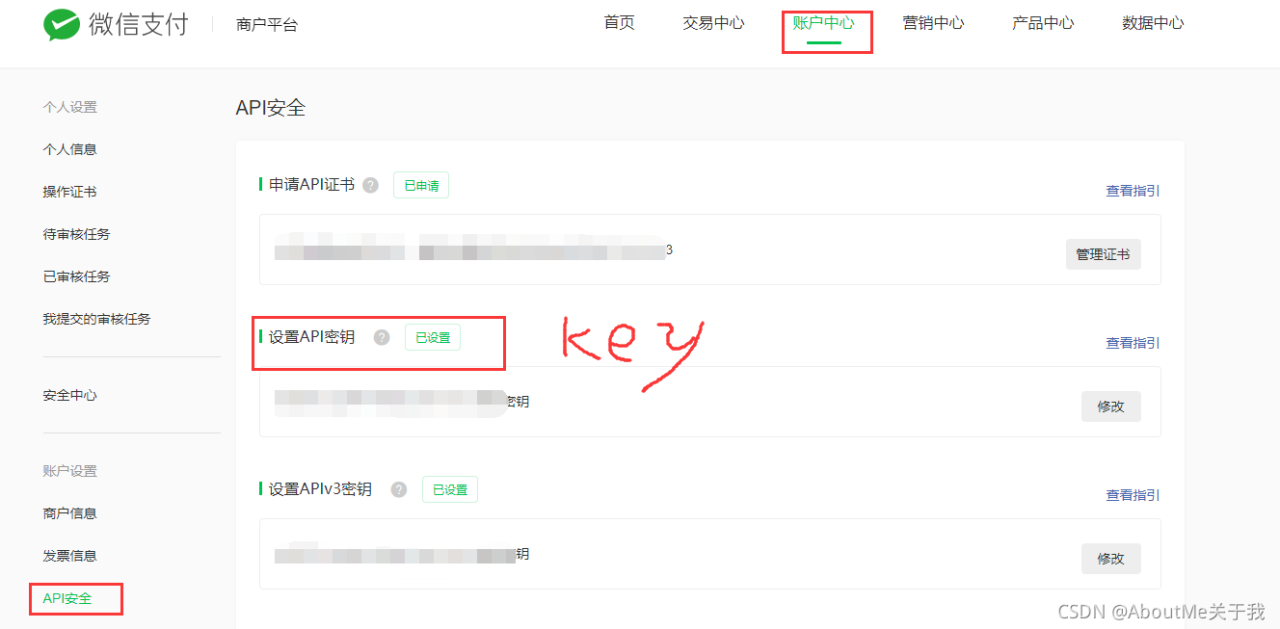
4.微信支付平台(简称平台)设置密钥,(密钥就是签名时要用的 key) 如图:
然后进入正题,首先服务器后端项目需要加入依赖:
		com.github.wxpay
		wxpay-sdk
		0.0.3
以上的依赖官方已经封装了支付的方法及工具,使用起来很是方便,完全不用从基础一步一步根据API 封装实现。省了我们不少麻烦和繁琐。
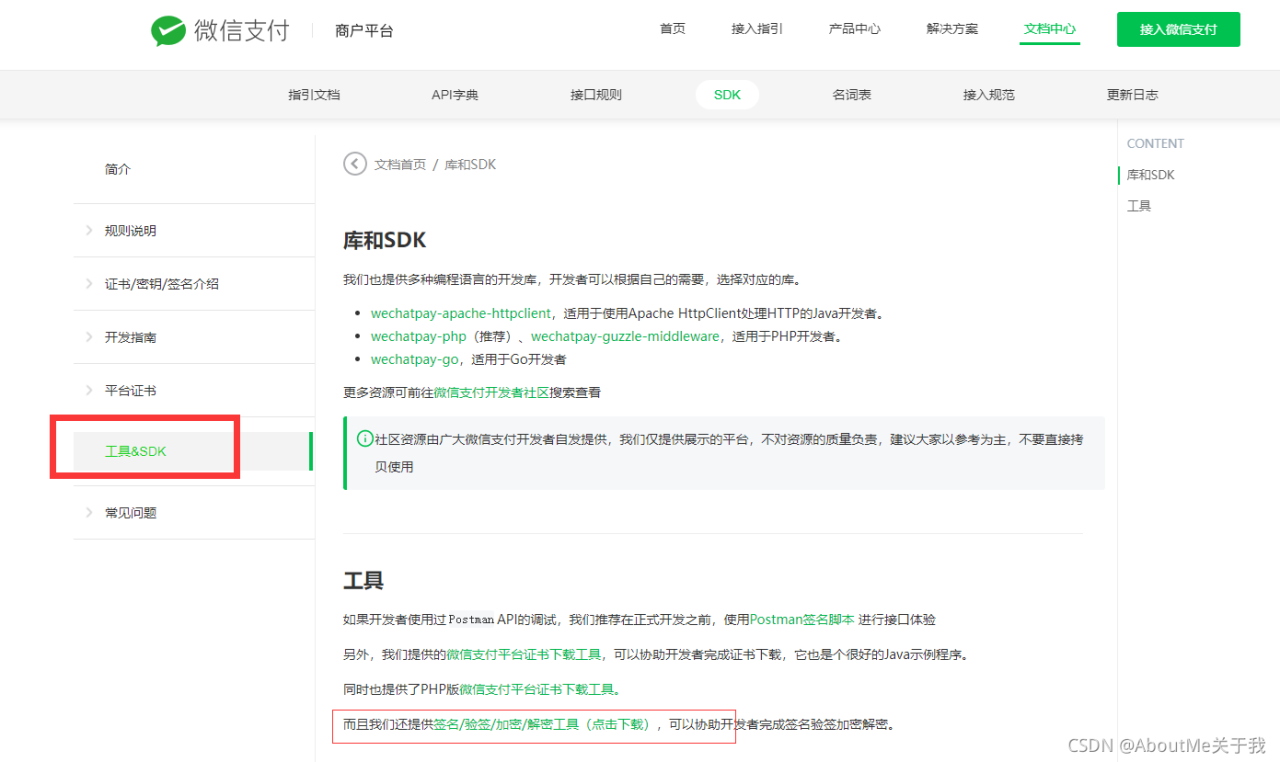
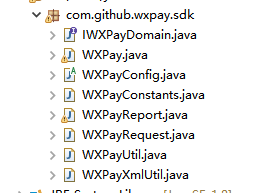
也可以从支付平台下载SDK和demo对比,查看具体的内容, 其内容和依赖是一样的。
如图:
现在开始看代码,虽然封装了一些方法,但是项目还是需要配置一下自己的东西,比如appid 、商户号以及key 的配置,
package com.xn.weixin.common;
import java.io.ByteArrayInputStream;
import java.io.InputStream;
import com.github.wxpay.sdk.WXPayConfig;
//  需要实现一下支付基本的配置,方便调用
	public class MyPayConfig implements WXPayConfig{
			private byte[] certData;
			public void MyConfig() throws Exception {
					//此处暂时用不到,这里是读取证书的地方
			}
		    public String getAppID() {
		        return "这里是你的appid";
		    }

		    public String getMchID() {
		    //申请普通商户时分配给你的商户号
		        return "这里是你的商户号";
		    }

		    public String getKey() {
		    //这里的key 就是你在支付平台设置的API密钥
		        return "这是就是你的Key了";
		    }

		    public InputStream getCertStream() {
		        ByteArrayInputStream certBis = new ByteArrayInputStream(this.certData);
		        return certBis;
		    }

		    public int getHttpConnectTimeoutMs() {
		        return 8000;
		    }

		    public int getHttpReadTimeoutMs() {
		        return 10000;
		    }
}
接下来下一步,我们看API 文档中有下面几点:
商户系统和微信支付系统主要交互:
1、小程序内调用登录接口,获取到用户的openid,api参见公共api【小程序登录API】
2、商户server调用支付统一下单,api参见公共api【统一下单API】
3、商户server调用再次签名,api参见公共api【再次签名】
4、商户server接收支付通知,api参见公共api【支付结果通知API】
5、商户server查询支付结果,如未收到支付通知的情况,商户后台系统可调用【查询订单API】
按照这个顺序,我们的项目都准备好了,也就是第一步已经过了微信支付,我们现在正在从第二步开始,
小程序登录后 =openId 是必有的 所以登录后可以保存下获取的openId ,以方便以后 支付时使用;
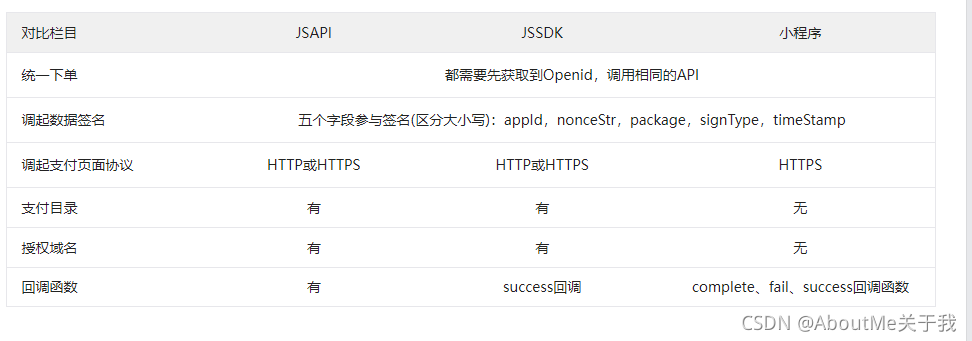
注意:
appid必须为最后拉起收银台的小程序appid;
mch_id为和appid成对绑定的支付商户号,收款资金会进入该商户号;
trade_type请填写JSAPI;
openid为appid对应的用户标识,即使用wx.login接口获得的openid
登录后进入商品页面,选择商品后,点击支付button ,首先就是要统一下单或JSAPI 下单,完成这一步返回得到 prepay_id 参数值,后面调用支付API 要用到。
我们看一下我们需要用到哪些参数:
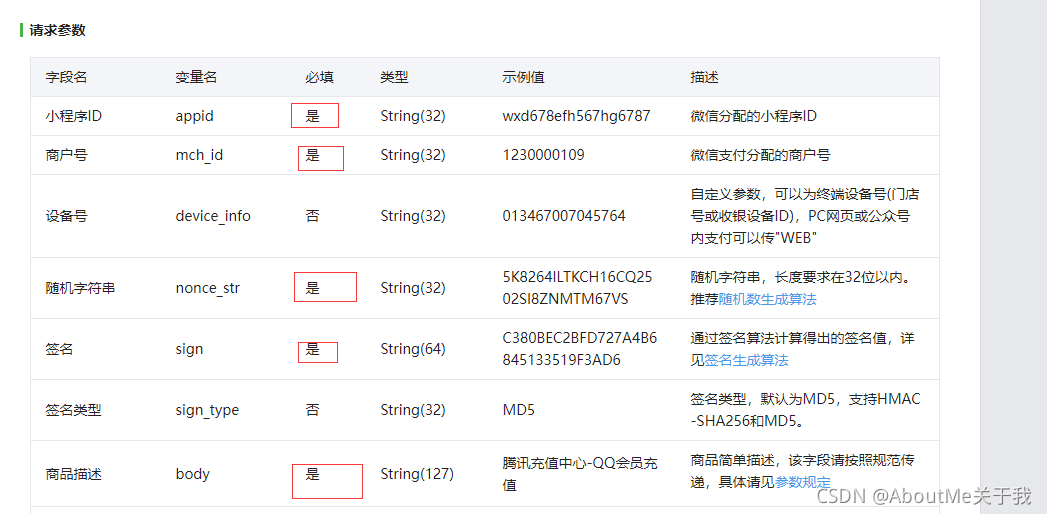
以下还有几个参数。大家可以自行看API ;
依赖中封装的就是这几个类;
微信支付 Java SDK
对微信支付开发者文档中给出的API进行了封装。
com.github.wxpay.sdk.WXPay类下提供了对应的方法:
方法名说明
microPay
刷卡支付
unifiedOrder
统一下单
orderQuery
查询订单
reverse
撤销订单
closeOrder
关闭订单
refund
申请退款
refundQuery
查询退款
downloadBill
下载对账单
report
交易保障
shortUrl
转换短链接
authCodeToOpenid
授权码查询openid
所以接下来上面配置好的config 就可以用到了
package com.xn.weixin.controller;
import java.util.HashMap;
import java.util.Map;
import javax.servlet.http.HttpServletRequest;
import org.springframework.web.bind.annotation.RequestMapping;
import org.springframework.web.bind.annotation.RestController;
import com.github.wxpay.sdk.WXPay;
import com.github.wxpay.sdk.WXPayConstants.SignType;
import com.github.wxpay.sdk.WXPayUtil;
import com.xn.system.entity.User;
import com.xn.util.ResultObj;
import com.xn.weixin.common.MyPayConfig;
@RestController
@RequestMapping("/pay/")
public class PaymentController {
@RequestMapping("payment")
public Object getpayment(HttpServletRequest request,String totalfee,String tradeno) throws Exception {
//	获取到当前登录用户,因为这里我保存了openid , 方法大家可以自己处理,这里就不展示了
	User user = User.getCurrentUserInfo().getUser();
	//当前就是我们自己配置的支付配置。appid 商户号 key 什么的;
	MyPayConfig config = new MyPayConfig();
	//当前类是官方为我们封装的一些使用的方法
    WXPay wxpay = new WXPay(config);
    //获取到 IP
    String clientIp = getIpAddress(request);
	System.err.println(clientIp);
	//封装请求参数 参数说明看API文档,当前就不进行讲解了
    Map data = new HashMap();
    data.put("body", "腾讯充值中心-QQ会员充值");
    data.put("out_trade_no", "2016090910595900000012");
    data.put("device_info", "12345679"); //此处设备或商品编号
    data.put("fee_type", "CNY");  // 货币类型  人民币

     // 支付中没有小数点,起步以分做为单们,当前为1 分钱,所以自行调整金额 ,这里可以做为传参,
     //选取商品金额传到后端来
     data.put("total_fee", "1");

    data.put("spbill_create_ip", "123.12.12.123");
    data.put("notify_url", "http://www.example.com/wxpay/notify");
    data.put("trade_type", "JSAPI");  // 此处指定JSAPI
    data.put("product_id", "12");
    data.put("openid", “这是是登录获取到的openId  必传”);
    //调用统一下单方法
    Map order = wxpay.unifiedOrder(data);
    //获取到需要的参数返回小程序
	return order;

}
// 获取 IP
public static String getIpAddress(HttpServletRequest request) {
	String ip = request.getHeader("x-forwarded-for");
	if (ip == null || ip.length() == 0 || "unknown".equalsIgnoreCase(ip)) {
		ip = request.getHeader("Proxy-Client-IP");
	}
	if (ip == null || ip.length() == 0 || "unknown".equalsIgnoreCase(ip)) {
		ip = request.getHeader("WL-Proxy-Client-IP");
	}
	if (ip == null || ip.length() == 0 || "unknown".equalsIgnoreCase(ip)) {
		ip = request.getHeader("HTTP_CLIENT_IP");
	}
	if (ip == null || ip.length() == 0 || "unknown".equalsIgnoreCase(ip)) {
		ip = request.getHeader("HTTP_X_FORWARDED_FOR");
	}
	if (ip == null || ip.length() == 0 || "unknown".equalsIgnoreCase(ip)) {
		ip = request.getRemoteAddr();
	}
	return ip;
}
}
大家可能要问了,为什么这里没有放入 appid 和 mchid 和 key,sign 签名
其实我们上面依赖中已经封装了,会自动获取到我们自己配置的 appid mchid 和key ,放入集合然后进行签名加密,下面看依赖中的方法:
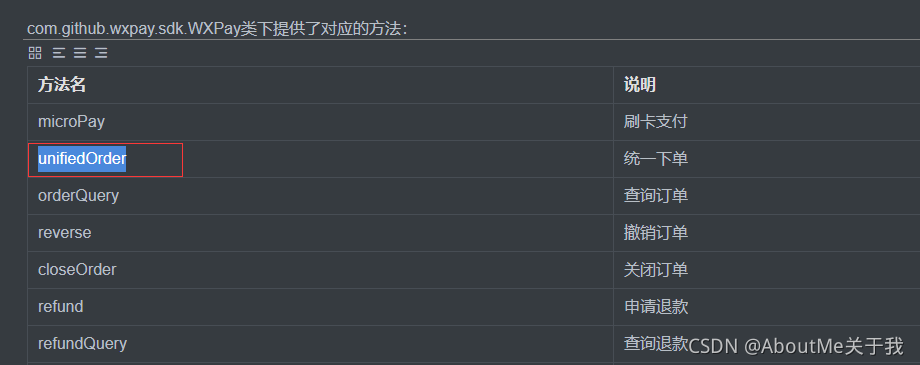
我们找到这个方法看看具体内容:
/**
     * 作用:统一下单

     * 场景:公共号支付、扫码支付、APP支付
     * @param reqData 向wxpay post的请求数据
     * @return API返回数据
     * @throws Exception
     */
    public Map unifiedOrder(Map reqData) throws Exception {
        return this.unifiedOrder(reqData, config.getHttpConnectTimeoutMs(), this.config.getHttpReadTimeoutMs());
    }
/**
 * 作用:统一下单

 * 场景:公共号支付、扫码支付、APP支付
 * @param reqData 向wxpay post的请求数据
 * @param connectTimeoutMs 连接超时时间,单位是毫秒
 * @param readTimeoutMs 读超时时间,单位是毫秒
 * @return API返回数据
 * @throws Exception
 */
public Map unifiedOrder(Map reqData,  int connectTimeoutMs, int readTimeoutMs) throws Exception {
    String url;
    if (this.useSandbox) {
        url = WXPayConstants.SANDBOX_UNIFIEDORDER_URL_SUFFIX;
    }
    else {
        url = WXPayConstants.UNIFIEDORDER_URL_SUFFIX;
    }
    if(this.notifyUrl != null) {
        reqData.put("notify_url", this.notifyUrl);
    }
    String respXml = this.requestWithoutCert(url, this.fillRequestData(reqData), connectTimeoutMs, readTimeoutMs);
    return this.processResponseXml(respXml);
}
以上中最后第二行用到了这个方法 this.fillRequestData(reqData),其作用就是
向 Map 中添加 appid、mch_id、nonce_str、sign_type、sign ,
它自动为我们加密签名 发送请求,xml 转换map 等操作,我们只需要接收返回的数据再次调用小程序支付API 就可以了
	 /**
 * 向 Map 中添加 appid、mch_id、nonce_str、sign_type、sign

 * 该函数适用于商户适用于统一下单等接口,不适用于红包、代金券接口
 *
 * @param reqData
 * @return
 * @throws Exception
 */
public Map fillRequestData(Map reqData) throws Exception {
    reqData.put("appid", config.getAppID());
    reqData.put("mch_id", config.getMchID());
    reqData.put("nonce_str", WXPayUtil.generateNonceStr());
    if (SignType.MD5.equals(this.signType)) {
        reqData.put("sign_type", WXPayConstants.MD5);
    }
    else if (SignType.HMACSHA256.equals(this.signType)) {
        reqData.put("sign_type", WXPayConstants.HMACSHA256);
    }
    reqData.put("sign", WXPayUtil.generateSignature(reqData, config.getKey(), this.signType));
    return reqData;
}
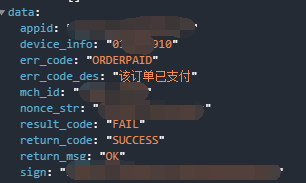
当我们小程序接收到服务器返回的参数数据,我们就可以再次调用wx.requestPayment(Object)发起微信支付。
统一下单返回的参数:
var data = {
		变量:金额什么的参数
}
	//小程序封装的post请求
	action.post("请求url",“data参数”,function( res){
	//支付请求 但是此处有大坑,一定要注意,

	wx.requestPayment(
		{
		"timeStamp":"",
		"nonceStr": "",
		"package": "",
		"signType": "MD5",
		"paySign": "",
		"success":function(res){},
		"fail":function(res){},
		"complete":function(res){}
	})
	})
但是此处有大坑,一定要注意,
//api上说是只有五个参数 实际上还有一个 appid 需要加上,api 中也有说起过,但是发起支付api 示例上没有,一不注意就容易忽略掉,如果没有appid 总是报支付问题,这个需要你们自己测试了,我就不多加演示了
至此基本算是完结了,但是我刚开始发起这一步的时候总是出现 支付签名验证失败,怎么也过不去,卡了两天,后来我虽然做出来了,但是我还没有深入理解,我现在只能把改动的内容告诉你们,原理就需要同志们自己研究啦,
下面是几个小方法,调用比较方便:
	// 时间戳
timeStamp:function () {
  return parseInt(new Date().getTime() / 1000) + ''
},
/* 随机数 */
randomString:function () {
  var chars = 'A2345678';
  var maxPos = chars.length;
  var pwd = '';
  for (var i = 0; i < 32; i++) {
    pwd += chars.charAt(Math.floor(Math.random() * maxPos));
  }
  return pwd;
},
  // 调起支付签名    这里我不太明白,虽然前面加载签名和后面验证,但里面加了随机数为什么验证还能通过我没还转过	      弯来,希望大家能搞明白吧,到时候可不要吝啬留言讲解一下下
MixedencryMD5:function (data,randomString,timeStamp) {
  var pay =  "appId=" + config.appid + "&nonceStr=" + randomString + "&package=prepay_id=" + data.prepay_id + 		  "&signType=MD5" + "&timeStamp=" + timeStamp+ "&key=" + config.key;
  console.log(md5.hexMD5(pay))
  return  md5.hexMD5(pay);
},
完整的调用小程序支付:
changePayment:function(){
  var that = this;
  var fee = that.data.inputValue*100;
  //小程序封装的post请求
	action.post("请求url",“data参数”,function( res){
	//支付请求 但是此处有大坑,一定要注意,

    //随机数
    var randomString = that.randomString();
    //当前时间
    var time = that.timeStamp();
    //签名
    var parSigns = that.MixedencryMD5(res.data,randomString,time);
      wx.requestPayment({
        appId:config.appid,
        timeStamp: time,
        nonceStr: randomString,
        package: "prepay_id="+res.data.prepay_id,
        signType: "MD5",
        paySign: parSigns,
        success (ress) {
          console.log(ress)
        },
        fail (ress) {
          console.log(ress)
        }
      })

  })
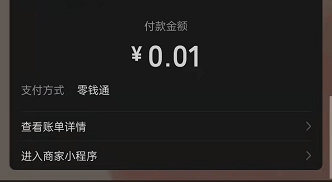
到此小程序支付我已经完成了,并且成功支付,挺开心。
下面我再放一下效果图,然后本文就结束了,请大拿多多指教,有问题就评论区见吧


文章评论(0)